Introduction to Docker

1. Prerequisites
There are no specific skills needed for this tutorial beyond a basic comfort with the command line and using a text editor. Prior experience in python will be helpful but is not required.
2. Docker Installation
Getting all the tooling setup on your computer can be a daunting task, but not with Docker. Getting Docker up and running on your favorite OS (Mac/Windows/Linux) is very easy.
The getting started guide on Docker has detailed instructions for setting up Docker on Mac/Windows/Linux.
Note
If you’re using Docker for Windows make sure you have shared your drive.
If you’re using an older version of Windows or MacOS you may need to use Docker Machine instead.
All commands work in either bash or Powershell on Windows.
Once you are done installing Docker, test your Docker installation by running the following command to make sure you are using version 1.13 or higher:
$ docker --version
Docker version 17.09.0-ce, build afdb6d4
When run without --version you should see a whole bunch of lines showing the different options available with docker. Alternatively you can test your installation by running the following:
$ docker run hello-world
Unable to find image 'hello-world:latest' locally
latest: Pulling from library/hello-world
03f4658f8b78: Pull complete
a3ed95caeb02: Pull complete
Digest: sha256:8be990ef2aeb16dbcb9271ddfe2610fa6658d13f6dfb8bc72074cc1ca36966a7
Status: Downloaded newer image for hello-world:latest

Hello from Docker.
This message shows that your installation appears to be working correctly.

To generate this message, Docker took the following steps:
 1. The Docker client contacted the Docker daemon.
 2. The Docker daemon pulled the "hello-world" image from the Docker Hub.
 3. The Docker daemon created a new container from that image which runs the
    executable that produces the output you are currently reading.
 4. The Docker daemon streamed that output to the Docker client, which sent it
    to your terminal.
.......
Note
Depending on how you’ve installed Docker on your system, you might see a permission denied error after running the above command. If you’re on Linux, you may need to prefix your Docker commands with sudo. Alternatively to run docker command without sudo, you need to add your user (who has root privileges) to docker group.
For this run:
Create the docker group:
$ sudo groupadd docker
Add your user to the docker group:
$ sudo usermod -aG docker $USER
Log out and log back in so that your group membership is re-evaluated
3. Running Docker containers
Now that you have everything setup, it’s time to get our hands dirty. In this section, you are going to run a container from Alpine Linux (a lightweight linux distribution) image on your system and get a taste of the docker run command.
But wait, what exactly is a container and image?
Containers - Running instances of Docker images - containers run the actual applications. A container includes an application and all of its dependencies. It shares the kernel with other containers, and runs as an isolated process in user space on the host OS.
Images - The file system and configuration of our application which are used to create containers. To find out more about a Docker image, run docker inspect hello-world and docker history hello-world. In the demo above, you could have used the docker pull command to download the hello-world image. However when you executed the command docker run hello-world, it also did a docker pull behind the scenes to download the hello-world image with latest tag (we will learn more about tags little later).
Now that we know what a container and image is, let’s run the following command in our terminal:
$ docker run alpine ls -l
total 52
drwxr-xr-x    2 root     root          4096 Dec 26  2016 bin
drwxr-xr-x    5 root     root           340 Jan 28 09:52 dev
drwxr-xr-x   14 root     root          4096 Jan 28 09:52 etc
drwxr-xr-x    2 root     root          4096 Dec 26  2016 home
drwxr-xr-x    5 root     root          4096 Dec 26  2016 lib
drwxr-xr-x    5 root     root          4096 Dec 26  2016 media
........
Similar to docker run hello-world command in the demo above, docker run alpine ls -l command fetches the alpine:latest image from the Docker registry first, saves it in our system and then runs a container from that saved image.
When you run docker run alpine, you provided a command ls -l, so Docker started the command specified and you saw the listing
You can use the docker images command to see a list of all images on your system
$ docker images
REPOSITORY              TAG                 IMAGE ID            CREATED             VIRTUAL SIZE
alpine                  latest              c51f86c28340        4 weeks ago         1.109 MB
hello-world             latest              690ed74de00f        5 months ago        960 B
Let’s try something more exciting.
$ docker run alpine echo "Hello world"
Hello world
OK, that’s some actual output. In this case, the Docker client dutifully ran the echo command in our alpine container and then exited it. If you’ve noticed, all of that happened pretty quickly. Imagine booting up a virtual machine, running a command and then killing it. Now you know why they say containers are fast!
Try another command.
$ docker run alpine sh
Wait, nothing happened! Is that a bug? Well, no. These interactive shells will exit after running any scripted commands such as sh, unless they are run in an interactive terminal - so for this example to not exit, you need to docker run -it alpine sh. You are now inside the container shell and you can try out a few commands like ls -l, uname -a and others.
Before doing that, now it’s time to see the docker ps command which shows you all containers that are currently running.
$ docker ps
CONTAINER ID        IMAGE               COMMAND             CREATED             STATUS              PORTS               NAMES
Since no containers are running, you see a blank line. Let’s try a more useful variant: docker ps -a
$ docker ps -a
CONTAINER ID        IMAGE               COMMAND                  CREATED             STATUS                      PORTS               NAMES
36171a5da744        alpine              "/bin/sh"                5 minutes ago       Exited (0) 2 minutes ago                        fervent_newton
a6a9d46d0b2f        alpine             "echo 'hello from alp"    6 minutes ago       Exited (0) 6 minutes ago                        lonely_kilby
ff0a5c3750b9        alpine             "ls -l"                   8 minutes ago       Exited (0) 8 minutes ago                        elated_ramanujan
c317d0a9e3d2        hello-world         "/hello"                 34 seconds ago      Exited (0) 12 minutes ago                       stupefied_mcclintock
What you see above is a list of all containers that you ran. Notice that the STATUS column shows that these containers exited a few minutes ago.
If you want to run scripted commands such as sh, they should be run in an interactive terminal. In addition, interactive terminal allows you to run more than one command in a container. Let’s try that now:
$ docker run -it alpine sh
/ # ls
bin    dev    etc    home   lib    media  mnt    proc   root   run    sbin   srv    sys    tmp    usr    var
/ # uname -a
Linux de4bbc3eeaec 4.9.49-moby #1 SMP Wed Sep 27 23:17:17 UTC 2017 x86_64 Linux
Running the run command with the -it flags attaches us to an interactive tty in the container. Now you can run as many commands in the container as you want. Take some time to run your favorite commands.
Exit out of the container by giving the exit command.
/ # exit
Note
If you type exit your container will exit and is no longer active. To check that, try the following:
$ docker ps -l
CONTAINER ID        IMAGE                 COMMAND                  CREATED             STATUS                          PORTS                    NAMES
de4bbc3eeaec        alpine                "/bin/sh"                3 minutes ago       Exited (0) About a minute ago                            pensive_leavitt
If you want to keep the container active, then you can use keys Ctrl-p, Ctrl-q. To make sure that it is not exited run the same docker ps -a command again:
$ docker ps -l
CONTAINER ID        IMAGE                 COMMAND                  CREATED             STATUS                         PORTS                    NAMES
0db38ea51a48        alpine                "sh"                     3 minutes ago       Up 3 minutes                                            elastic_lewin
Now if you want to get back into that container, then you can type docker attach <container id>. This way you can save your container:
$ docker attach 0db38ea51a48
4. Managing data in Docker
From the above examples, we learned that a running Docker container is an isolated environment created from an Docker image. This means, although it is possible to store data within the “writable layer” of a container, there are some limitations:
- The data doesn’t persist when that container is no longer running, and it can be difficult to get the data out of the container if another process needs it.
- A container’s writable layer is tightly coupled to the host machine where the container is running. You can’t easily move the data somewhere else.
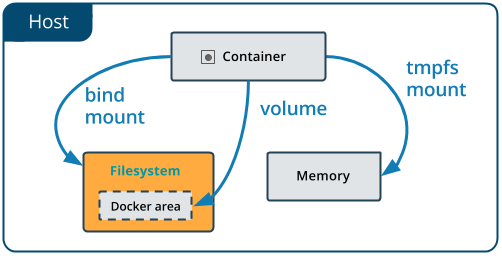
Docker offers three different ways to mount data into a container from the Docker host: volumes, bind mounts, or tmpfs volumes. For simplicity, we will only discuss bind mounts here, even though volumes is the more powerful and usable option for most use cases.
4.1 Bind mounts
Bind mounts: When you use a bind mount, a file or directory on the host machine is mounted into a container.
Warning
One side effect of using bind mounts, for better or for worse, is that you can change the host filesystem via processes running in a container, including creating, modifying, or deleting important system files or directories. This is a powerful ability which can have security implications, including impacting non-Docker processes on the host system.
If you use --mount to bind-mount a file or directory that does not yet exist on the Docker host, Docker does not automatically create it for you, but generates an error.
4.1.1 Start a container with a bind mount
Let’s clone a git repository to obtain our data sets:
$ git clone git@github.com:AstroContainers/2018-05-examples.git
We can then cd into the HOPS work directory, and mount it to /root as we launch the eventhorizontelescope/hops container:
$ cd 2018-05-examples/hops
$ ls
1234
$ docker run -it --rm --name hops -v $PWD:/root eventhorizontelescope/hops
Setup HOPS v3.19 with HOPS_ROOT=/root for x86_64-3.19
You will start at the /root work directory and the host data 1234 is available in it:
$ pwd
/root
$ ls
1234
You can open another terminal and use docker inspect hops | grep -A9 Mounts to verify that the bind mount was created correctly. Look for the “Mounts” section
$ docker inspect hops | grep -A9 Mounts
"Mounts": [
    {
        "Type": "bind",
        "Source": "/Users/ckchan/2018-05-examples/hops",
        "Destination": "/root",
        "Mode": "",
        "RW": true,
        "Propagation": "rprivate"
    }
],
This shows that the mount is a bind mount, it shows the correct source and target, it shows that the mount is read-write, and that the propagation is set to rprivate.
Use case 1: Processing VLBI data with HOPS in Docker
HOPS stands for the Haystack Observatory Postprocessing System. It is a standard tool used in Very-long-baseline interferometry (VLBI) to perform data analysis. HOPS has a long history and it depends on legacy libraries. This makes it difficult to compile HOPS on modern Unix/Linux systems. Nevertheless, the Docker, you have already launched a HOPS envirnment that you can analysis VLBI data!
The most basic step in analysis VLBI is called “fringe fitting”, which we will perform in the running HOPS container by
$ ls 1234/No0055/
3C279.zxxerd  L..zxxerd  LL..zxxerd  LW..zxxerd  W..zxxerd  WW..zxxerd
$ fourfit 1234
fourfit: Warning: No valid data for this pass for pol 2
fourfit: Warning: No valid data for this pass for pol 3
$ ls 1234/No0055/
3C279.zxxerd  LL..zxxerd     LL.B.2.zxxerd  LW.B.3.zxxerd  W..zxxerd   WW.B.5.zxxerd
L..zxxerd     LL.B.1.zxxerd  LW..zxxerd     LW.B.4.zxxerd  WW..zxxerd
fourfit reads in the correlated data and create the so called “fringe files”. The warnings are normal because there are missing polarizations in the data. In order to see the result of the fringe fitting, you can use fplot:
$ fplot -d %04d.ps 1234
$ ls
0000.ps  0001.ps  0002.ps  0003.ps  0004.ps  1234
You just created 4 fringe plots which contain all important information of the VLBI experiment! Now you can exit your HOPS container and open them on your host machine.
5. Exposing container ports
Mounting a host directory is one way to make a container connect with the outside work. Another possible is through network by exposing a port.
Use case 2: Processing Galaxy Simulation with Jupyter in Docker
In this second use case, we will use Docker to run a “ready to go” Jupyter notebook in a container. We will expose the port 8888 from the container to the localhost so that you can connect to the notebook.
Inside the 2018-05-examples git repository that you downloaded earlier, there is a sample Galaxy simulation:
    $ pwd
    /Users/ckchan/2018-05-examples/hops
    $ cd ../galaxy/
    $ pwd
    /Users/ckchan/2018-05-examples/galaxy

    # Specify the uid of the jovyan user. Useful to mount host volumes with specific file ownership. For this option to take effect, you must run the container with --user root

    $ docker run -it --rm -v $PWD:/home/jovyan/work -p 8888:8888 -e NB_UID=$(id -u) --user root astrocontainers/jupyter
    Set username to: jovyan
    usermod: no changes
    Set jovyan UID to: 1329
    Executing the command: jupyter notebook
    [I 23:36:09.446 NotebookApp] Writing notebook server cookie secret to /home/jovyan/.local/share/jupyter/runtime/notebook_cookie_secret
    [W 23:36:09.686 NotebookApp] WARNING: The notebook server is listening on all IP addresses and not using encryption. This is not recommended.
    [I 23:36:09.722 NotebookApp] JupyterLab beta preview extension loaded from /opt/conda/lib/python3.6/site-packages/jupyterlab
    [I 23:36:09.722 NotebookApp] JupyterLab application directory is /opt/conda/share/jupyter/lab
    [I 23:36:09.730 NotebookApp] Serving notebooks from local directory: /home/jovyan
    [I 23:36:09.730 NotebookApp] 0 active kernels
    [I 23:36:09.730 NotebookApp] The Jupyter Notebook is running at:
    [I 23:36:09.730 NotebookApp] http://[all ip addresses on your system]:8888/?token=a81dbeec92b286df393bb484fdf53efffab410fd64ec8702
    [I 23:36:09.730 NotebookApp] Use Control-C to stop this server and shut down all kernels (twice to skip confirmation).
    [C 23:36:09.731 NotebookApp]
    Copy/paste this URL into your browser when you connect for the first time,
to login with a token:
    http://localhost:8888/?token=dfb50de6c1da091fd62336ac52cdb88de5fe339eb0faf478
The last line is a URL that we need to copy and paste into our browser to access our new Jupyter Notebook:
http://localhost:8888/?token=dfb50de6c1da091fd62336ac52cdb88de5fe339eb0faf478
Warning
Do not copy and paste the above URL in your browser as this URL is specific to my environment and it doesn’t work for you.
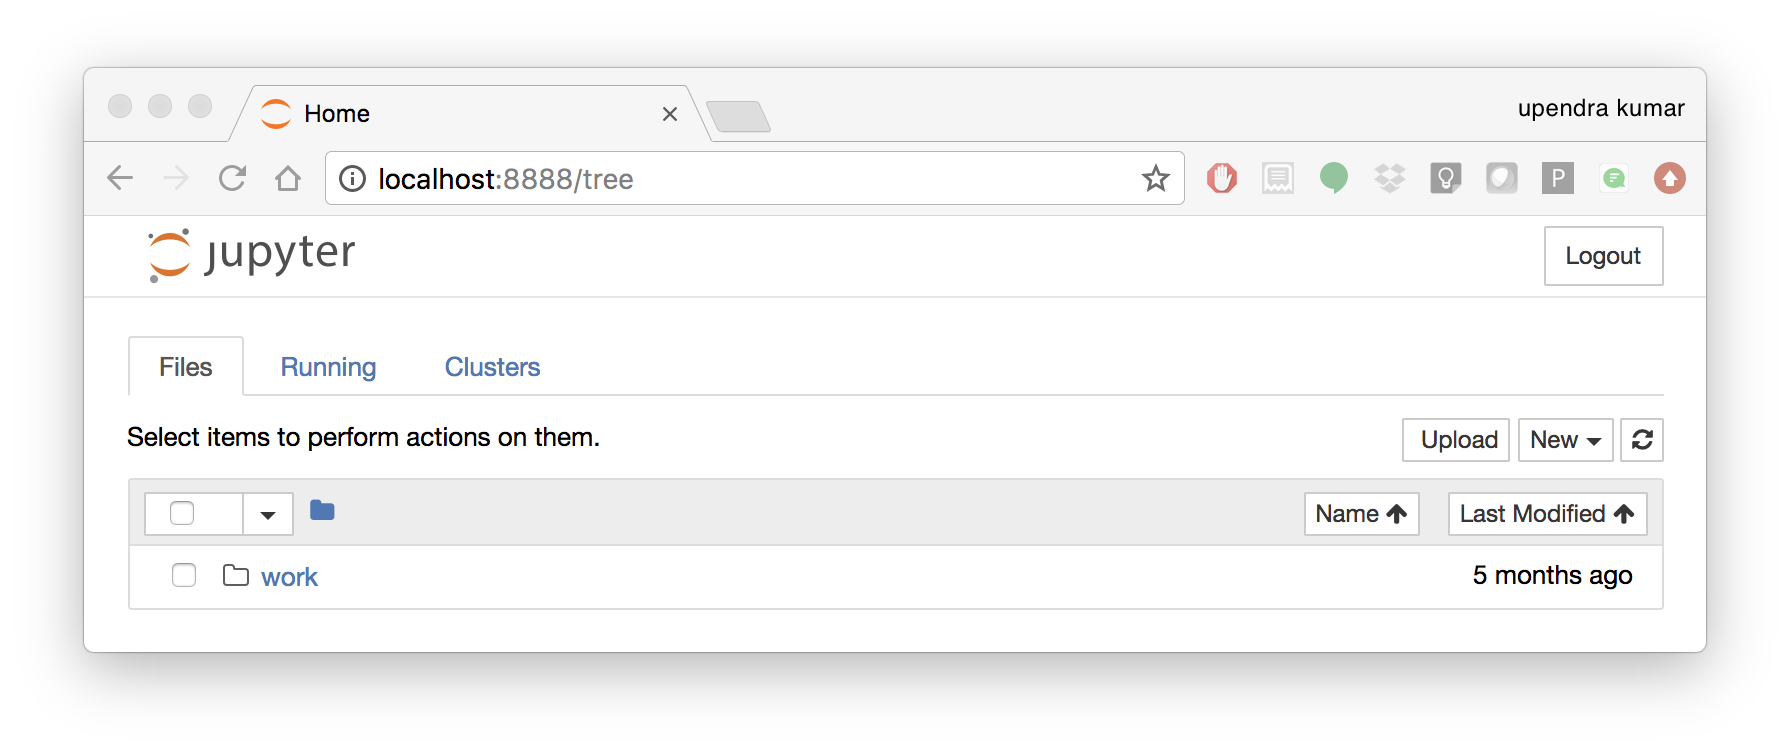
Once you’ve done that you should be greeted by your very own containerised Jupyter service! Now open work/InClassLab7_Template_wSolutions.ipynb and try analysis a Galaxy simulation!

To shut down the container once you’re done working, simply hit Ctrl-C in the terminal/command prompt. Your work will all be saved on your actual machine in the path we set in our Docker compose file. And there you have it — a quick and easy way to start using Jupyter notebooks with the magic of Docker.