Advanced Docker
Now that we are relatively comfortable with Docker basics, lets look at some of the advanced Docker topics such as building your own Docker image (manul and automatic) using Dockerfile, porting the Docker image to repositories (public and private), and finally deploy containers into cloud and other infrastructures, etc.
1. Building Docker images
As our HOPS example showed in the last session, one area where Docker shines is when you need to use a command line utility that has a large number of dependencies.
In this session, let’s dive deeper into what Docker images are. Later on we will build our own image and use that image to run an application locally.
1.1 Docker images
Docker images are the basis of containers. In the previous example, you pulled the hello-world image from the registry and asked the Docker client to run a container based on that image. To see the list of images that are available locally on your system, run the docker images command.
$ docker images
REPOSITORY     TAG       IMAGE ID        CREATED           SIZE
astroml        latest    8054c898a213    27 seconds ago    934MB
debian         stretch   8626492fecd3    7 days ago        101MB
hello-world    latest    690ed74de00f    5 months ago      960 B
alpine         latest    3fd9065eaf02    3 months ago      4.15MB
.........
Above is a list of images that I’ve pulled from the registry and those I’ve created myself (we’ll shortly see how). You will have a different list of images on your machine. The TAG refers to a particular snapshot of the image and the ID is the corresponding unique identifier for that image.
For simplicity, you can think of an image akin to a git repository - images can be committed with changes and have multiple versions. When you do not provide a specific version number, the client defaults to latest.
For example you could pull a specific version of ubuntu image as follows:
$ docker pull ubuntu:16.04
If you do not specify the version number of the image, as mentioned, the Docker client will default to a version named latest.
So for example, the docker pull command given below will pull an image named ubuntu:latest
$ docker pull ubuntu
To get a new Docker image you can either get it from a registry (such as the Docker hub) or create your own. There are hundreds of thousands of images available on Docker hub. You can also search for images directly from the command line using docker search.
$ docker search ubuntu
  NAME                                                   DESCRIPTION                                     STARS               OFFICIAL            AUTOMATED
  ubuntu                                                 Ubuntu is a Debian-based Linux operating sys…   7310                [OK]
  dorowu/ubuntu-desktop-lxde-vnc                         Ubuntu with openssh-server and NoVNC            163                                     [OK]
  rastasheep/ubuntu-sshd                                 Dockerized SSH service, built on top of offi…   131                                     [OK]
  ansible/ubuntu14.04-ansible                            Ubuntu 14.04 LTS with ansible                   90                                      [OK]
  ubuntu-upstart                                         Upstart is an event-based replacement for th…   81                  [OK]
  neurodebian                                            NeuroDebian provides neuroscience research s…   43                  [OK]
  ubuntu-debootstrap                                     debootstrap --variant=minbase --components=m…   35                  [OK]
  1and1internet/ubuntu-16-nginx-php-phpmyadmin-mysql-5   ubuntu-16-nginx-php-phpmyadmin-mysql-5          26                                      [OK]
  nuagebec/ubuntu                                        Simple always updated Ubuntu docker images w…   22                                      [OK]
  tutum/ubuntu                                           Simple Ubuntu docker images with SSH access     18
  ppc64le/ubuntu                                         Ubuntu is a Debian-based Linux operating sys…   11
  i386/ubuntu                                            Ubuntu is a Debian-based Linux operating sys…   9
  1and1internet/ubuntu-16-apache-php-7.0                 ubuntu-16-apache-php-7.0                        7                                       [OK]
  eclipse/ubuntu_jdk8                                    Ubuntu, JDK8, Maven 3, git, curl, nmap, mc, …   5                                       [OK]
  darksheer/ubuntu                                       Base Ubuntu Image -- Updated hourly             3                                       [OK]
  codenvy/ubuntu_jdk8                                    Ubuntu, JDK8, Maven 3, git, curl, nmap, mc, …   3                                       [OK]
  1and1internet/ubuntu-16-nginx-php-5.6-wordpress-4      ubuntu-16-nginx-php-5.6-wordpress-4             2                                       [OK]
  1and1internet/ubuntu-16-nginx                          ubuntu-16-nginx                                 2                                       [OK]
  pivotaldata/ubuntu                                     A quick freshening-up of the base Ubuntu doc…   1
  smartentry/ubuntu                                      ubuntu with smartentry                          0                                       [OK]
  pivotaldata/ubuntu-gpdb-dev                            Ubuntu images for GPDB development              0
  1and1internet/ubuntu-16-healthcheck                    ubuntu-16-healthcheck                           0                                       [OK]
  thatsamguy/ubuntu-build-image                          Docker webapp build images based on Ubuntu      0
  ossobv/ubuntu                                          Custom ubuntu image from scratch (based on o…   0
  1and1internet/ubuntu-16-sshd                           ubuntu-16-sshd                                  0                                       [OK]
An important distinction with regard to images is between base images and child images and official images and user images (Both of which can be base images or child images.).
Important
Base images are images that have no parent images, usually images with an OS like ubuntu, alpine or debian.
Child images are images that build on base images and add additional functionality.
Official images are Docker sanctioned images. Docker, Inc. sponsors a dedicated team that is responsible for reviewing and publishing all Official Repositories content. This team works in collaboration with upstream software maintainers, security experts, and the broader Docker community. These are not prefixed by an organization or user name. In the list of images above, the python, node, alpine and nginx images are official (base) images. To find out more about them, check out the Official Images Documentation.
User images are images created and shared by users like you. They build on base images and add additional functionality. Typically these are formatted as user/image-name. The user value in the image name is your Dockerhub user or organization name.
1.2 Building custom Docker images
1.2.1 Using docker commit (not recommended)
As we saw in the Docker introduction, the general Docker workflow is:
- start a container based on an image in a known state
- add things to the filesystem, such as packages, codebases, libraries, files, or anything else
- commit the changes as layers to make a new image
Let’s follow this workflow to built a custom image. Instead of alpine this time we will use ubuntu linux image to install some interesting packages
As before first either pull the ubuntu docker image or you can just docker run -it ubuntu to pull and run the container interactively
$ docker run -it ubuntu:16.04
Unable to find image 'ubuntu:16.04' locally
16.04: Pulling from library/ubuntu
Digest: sha256:9ee3b83bcaa383e5e3b657f042f4034c92cdd50c03f73166c145c9ceaea9ba7c
Status: Downloaded newer image for ubuntu:16.04
root@7f989e4174aa:/#
Let’s install two packages fortune, cowsay, lolcat inside the container. But before that it’s alway good idea to update the packages that are already existing in the ubuntu.
root@7f989e4174aa:/# apt-get update
root@7f989e4174aa:/# apt-get install -y fortune cowsay lolcat
Now exit the container and run docker ps -a to check to see if the status of the container (which is exit in this case)
root@7f989e4174aa:/# exit
Go ahead and commit the changes and create a new image.
docker commit -m "Installed fortune cowsay lolcat" $(docker ps -lq) ubuntu/fortunecowsaylolcat
sha256:77ae42b823e60c2a350228d892aacda337e1e01c19c3ae72da104f7f4a77f83f
Congratulatios. You created your fist Docker image. Check to see your docker image in the list of images using docker images. Let’s run a container using that newly created docker image
$ docker run ubuntu/fortunecowsaylolcat /usr/games/cowsay "Hi"
 ____
< Hi >
 ----
        \   ^__^
         \  (oo)\_______
            (__)\       )\/\
                ||----w |
                ||     ||
and another one
$ docker run ubuntu/fortunecowsay /usr/games/fortune
It's all in the mind, ya know.
Pretty cool isn’t it..
Exercise: Can you figure out a way to combine these two commands in this order fortune, cowsay and lolcat to print what cowsay of the fortune output?
Hint: Use pipe and use interactive terminal
1.2.2 Using Dockerfile (recommended)
As you noticed by now that this method of making images is not reproducible. For example if you shae this image with someone (we will see how it is done later), then they wouldn’t know what is installed in this image. Ofcourse you can provide them with your notes but still it’s not reproducible. Rather than just running commands and installing commands using apt-get install, we’ll put our instructions in a special file called the Dockerfile
What exactly is a Dockerfile?
A Dockerfile is a text document that contains all the commands a user could call on the command line to assemble an image. Using docker build users can create an automated build that executes several command-line instructions in succession. Let’s create a Dockerfile for the above image
Open up a text editor of your choice and type in the following commands and save it as Dockerfile
Tip
You can name your Dockerfile as anything but according to best practices it is recommended to name it as Dockerfile for reasons we will see later
FROM ubuntu:16.04
MAINTAINER Upendra Devisetty <upendra@cyverse.org>
LABEL version="1.0" description="This Dockerfile is for building fortune cowsay lolcat ubuntu image"
RUN apt-get update
RUN apt-get install -y fortune cowsay lolcat

ENV PATH=/usr/games/:$PATH
CMD fortune | cowsay | lolcat
That’s it. Now building the Docker image using docker build command as below. The docker build command is quite simple - it takes an optional tag name with the -t flag, and the location of the directory containing the Dockerfile - the . indicates the current directory:
docker build -t ubuntu/fortunecowsaylolcat2 .
Sending build context to Docker daemon  2.048kB
Step 1/5 : FROM ubuntu:16.04
 ---> c9d990395902
Step 2/5 : MAINTAINER Upendra Devisetty <upendra@cyverse.org>
 ---> Running in a365c28eb283
Removing intermediate container a365c28eb283
 ---> 91d18ff89d44
Step 3/5 : LABEL Description "This Dockerfile is for building fortune coway ubuntu image"
 ---> Running in d24ff4a347fa
Removing intermediate container d24ff4a347fa
 ---> 73daa1277fea
Step 4/5 : RUN apt-get update
 ---> Running in eed1e2fe25de
 ..........
 ..........
 Successfully built ffe89a681d5c
Successfully tagged ubuntu/fortunecowsaylolcat2:latest
Great! We successfully built a Docker image using Dockerfile. Let’s test it out by launching a container using docker run.
$ docker run --rm ubuntu/fortunecowsaylolcat2:1.0
         ________________________________
        / It was all so different before \
        \ everything changed.            /
         --------------------------------
                \   ^__^
                 \  (oo)\_______
                    (__)\       )\/\
                        ||----w |
                        ||     ||
Superb! So you have build a Docker image using Dockerfile. See how easy it is and it is also reproducible since you know how it is built. In addition, you can version control (using git or others) this Dockerfile.
Before we go further, let’s look at what those commands in Dockerfile mean
FROM
This instruction is used to set the base image for subsequent instructions. It is mandatory to set this in the first line of a Dockerfile. You can use it any number of times though.
MAINTAINER
This is a non-executable instruction used to indicate the author of the Dockerfile.
LABEL
You can assign metadata in the form of key-value pairs to the image using this instruction. It is important to notice that each LABEL instruction creates a new layer in the image, so it is best to use as few LABEL instructions as possible
RUN
This instruction lets you execute a command on top of an existing layer and create a new layer with the results of command execution
CMD
This defines the commands that will run on the Image at start-up. Unlike a RUN, this does not create a new layer for the Image, but simply runs the command. There can only be one CMD per a Dockerfile/Image. If you need to run multiple commands, the best way to do that is to have the CMD run a script. CMD requires that you tell it where to run the command, unlike RUN.
ENV
This defines Environmental variables (one or more) in the Docker image
WORKDIR
The WORKDIR directive is used to set where the command defined with CMD is to be executed.
ENTRYPOINT
This argument sets the concrete default application that is used every time a container is created using the image. For example, if you have installed a specific application inside an image and you will use this image to only run that application, you can state it with ENTRYPOINT and whenever a container is created from that image, your application will be the target
Use case 1: Building a astroML Docker image
This is a minimal Docker image using astroML as an example. plot_spectrum_sum_of_norms.py is an example script from astroML. It is modified to run better in a container environment.
$ mkdir astroML && cd astroML

$ wget https://de.cyverse.org/dl/d/2CE93196-0F91-414F-B532-0AC8D3AE032E/plot_spectrum_sum_of_norms.py

$ vi Dockerfile
FROM debian:stretch
MAINTAINER Upendra Devisetty <upendra@cyverse.org>
LABEL version="1.0" description="This image is for astroML"

# The base image is minimal with very few software packages. We
# udpate apt and install python-pip with recommanded packages here.
RUN apt-get -qq update &&\
    apt-get install -y python-pip &&\
    apt-get clean && rm -rf /var/lib/apt/lists/* /tmp/* /var/tmp/*
# Next, we install astroML's dependencies and astroML itself using pip.
RUN pip install numpy scipy scikit-learn matplotlib astropy &&\
    pip install astroML astroML_addons

# Change the default work directory to "/root" inside the container.
WORKDIR /root

# Install Jupyter and other visualization packages
RUN pip install jupyter ipywidgets &&\
    jupyter nbextension enable --py --sys-prefix widgetsnbextension

COPY plot_spectrum_sum_of_norms.py /usr/bin
COPY run.sh /usr/bin
RUN chmod +x /usr/bin/plot_spectrum_sum_of_norms.py
RUN chmod +x /usr/bin/run.sh
ENTRYPOINT ["run.sh"]

$ vi run.sh
#!/bin/bash
plot_spectrum_sum_of_norms.py $1
Let’s build the image from the Dockerfile now
$ docker build -t debian/astroml:1.0 .
Now run the built image to execute first
$ docker run --rm -v ${PWD}:/root debian/astroml:1.0 test.pdf
The result is the pdf - test.pdf
Now remove the the two ouputs and run it with overriding the ENTRYPOINT
$ rm -r astroML_data test.pdf

$ docker run --rm -it -p 8888:8888 -v ${PWD}:/root --entrypoint jupyter-notebook debian/astroml:1.0 --allow-root --ip='*' --no-browser
[W 18:11:00.622 NotebookApp] WARNING: The notebook server is listening on all IP addresses and not using encryption. This is not recommended.
[I 18:11:00.629 NotebookApp] Serving notebooks from local directory: /root
[I 18:11:00.629 NotebookApp] 0 active kernels
[I 18:11:00.629 NotebookApp] The Jupyter Notebook is running at:
[I 18:11:00.629 NotebookApp] http://[all ip addresses on your system]:8888/?token=a2a9027494420d6151824ad23d930b91a37eeb44597454ac
[I 18:11:00.630 NotebookApp] Use Control-C to stop this server and shut down all kernels (twice to skip confirmation).
[C 18:11:00.633 NotebookApp]

    Copy/paste this URL into your browser when you connect for the first time,
    to login with a token:
        http://localhost:8888/?token=a2a9027494420d6151824ad23d930b91a37eeb44597454ac
- Exercise:
Create a new Jupyter notebook for the plot_spectrum_sum_of_norms.py script and execute it to make sure that all the steps are working fine..
2. Docker registries
To demonstrate the portability of what we just created, let’s upload our built Docker image and run it somewhere else (CyVerse Atmosphere cloud or Discovery Environment). After all, you’ll need to learn how to push to registries when you want to deploy containers to production.
Important
So what exactly is a registry?
A registry is a collection of repositories, and a repository is a collection of images—sort of like a GitHub repository, except the code is already built. An account on a registry can create many repositories. The docker CLI uses Docker’s public registry by default. You can even set up your own private registry using Docker Trusted Registry
There are several things you can do with Docker registries:
- Pushing images
- Finding images
- Pulling images
- Sharing images
2.1 Public repositories
Some example of public registries include Docker cloud, Docker hub and quay.io etc.,
2.1.1 Log in with your Docker ID
Now that you’ve created and tested your image, you can push it to Docker cloud or Docker hub.
Note
If you don’t have a Docker account, sign up for one at Docker cloud or Docker hub. Make note of your username. There are several advantages of registering to Dockerhub which we will see later on in the session
First you have to login to your Docker hub account. To do that:
$ docker login -u <dockerhub username>
Password:
Enter you Password when prompted.
2.1.2 Tag the image
The notation for associating a local image with a repository on a registry is username/repository:tag. The tag is optional, but recommended, since it is the mechanism that registries use to give Docker images a version. Give the repository and tag meaningful names for the context, such as get-started:part2. This will put the image in the get-started repository and tag it as part2.
Note
By default the docker image gets a latest tag if you don’t provide one. Thought convenient, it is not recommended for reproducibility purposes.
Now, put it all together to tag the image. Run docker tag image with your username, repository, and tag names so that the image will upload to your desired destination. For our docker image since we already have our Dockerhub username we will just add tag which in this case is 1.0
$ docker tag debian/astroml:1.0 <dockerhub username>/astroml:1.0
2.1.3 Publish the image
Upload your tagged image to the Dockerhub repository
$ docker push <dockerhub username>/astroml:1.0
Once complete, the results of this upload are publicly available. If you log in to Docker Hub, you will see the new image there, with its pull command.

Congrats! You just made your first Docker image and shared it with the world!
2.1.4 Pull and run the image from the remote repository
Let’s try to run the image from the remote repository on Cloud server by logging into CyVerse Atmosphere, launching an instance
First install Docker on Atmosphere using from here https://docs.docker.com/install/linux/docker-ce/ubuntu or alternatively you can use ezd command which is a short-cut command for installing Docker on Atmosphere
$ ezd
Now run the following command to run the docker image from Dockerhub
$ docker run --rm -v ${PWD}:/root upendradevisetty/astroml:1.0
Note
You don’t have to run docker pull since if the image isn’t available locally on the machine, Docker will pull it from the repository.
2.2 Private repositories
In an earlier part, we had looked at the Docker Hub, which is a public registry that is hosted by Docker. While the Dockerhub plays an important role in giving public visibility to your Docker images and for you to utilize quality Docker images put up by others, there is a clear need to setup your own private registry too for your team/organization. For example, CyVerse has it own private registry which will be used to push the Docker images.
2.2.1 Pull down the Registry Image
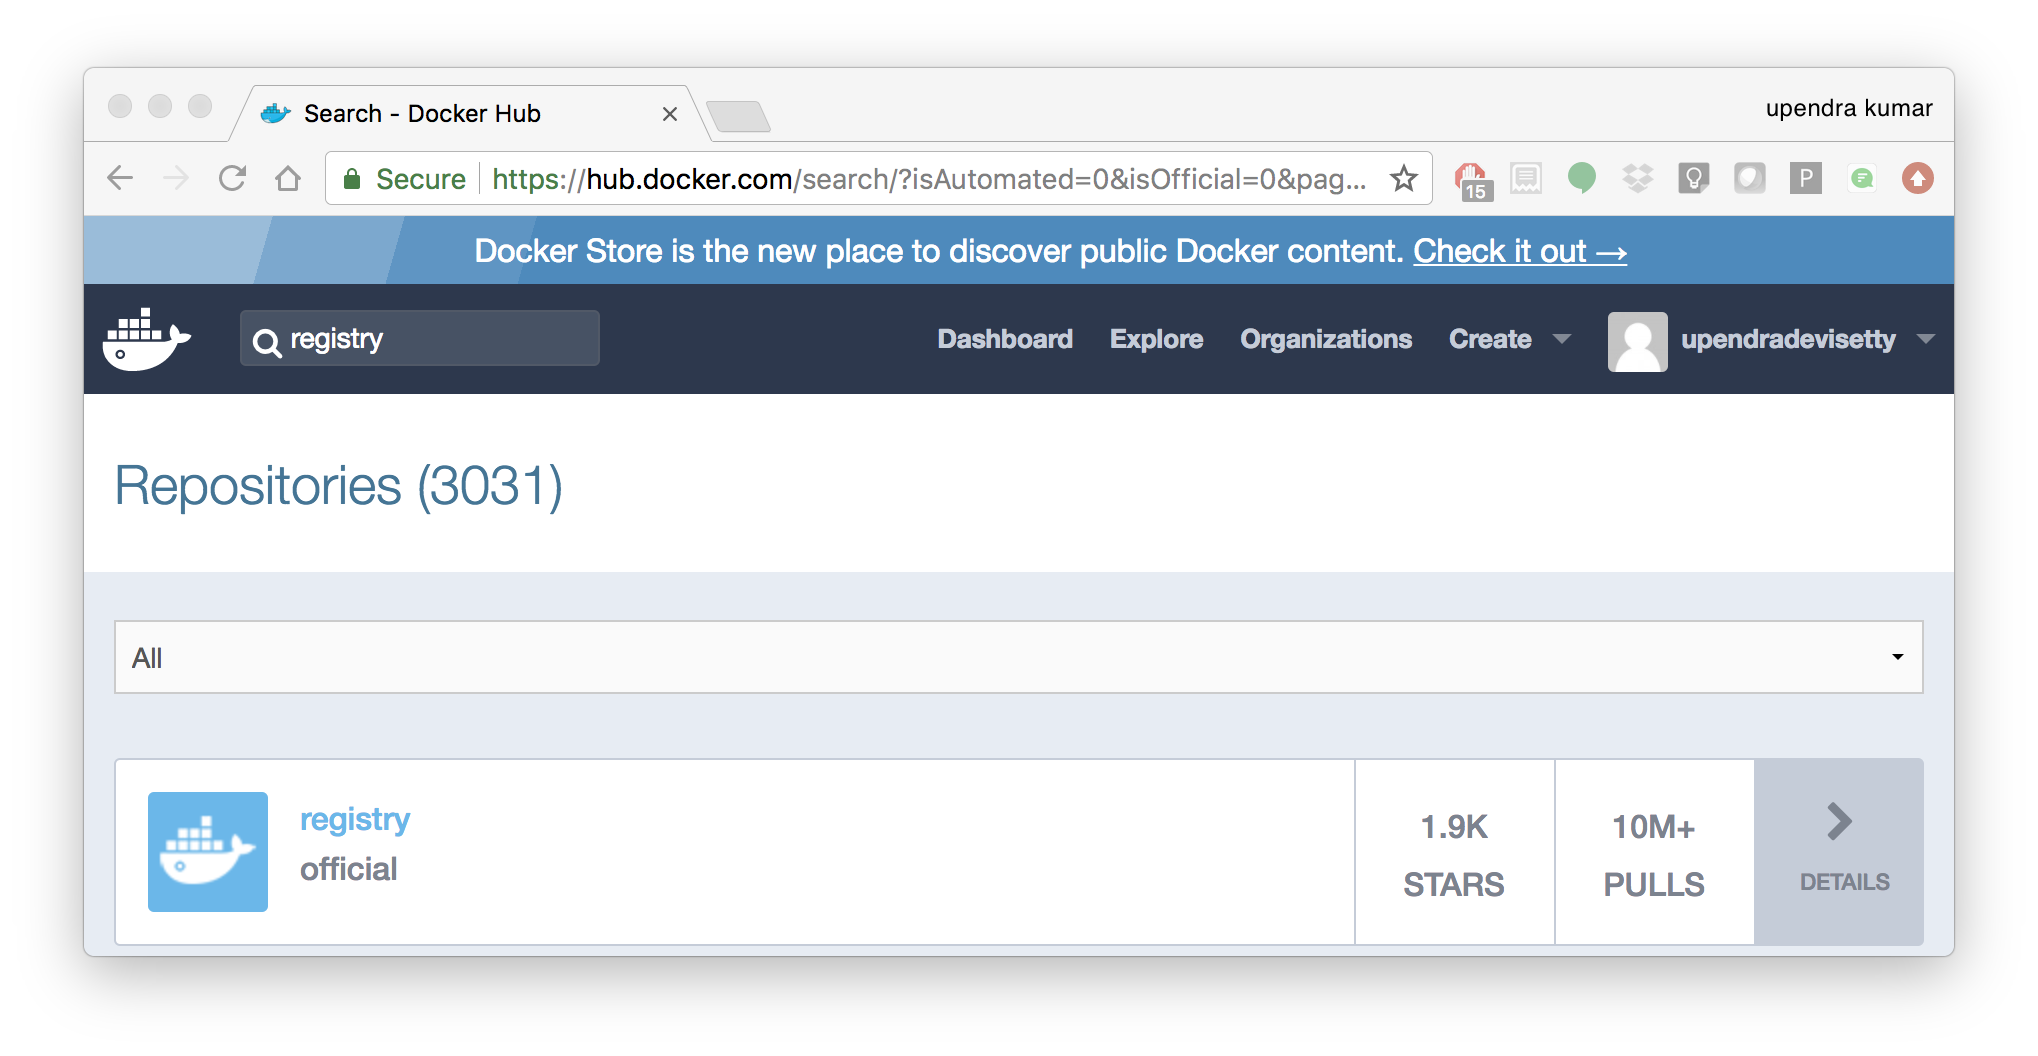
You might have guessed by now that the registry must be available as a Docker image from the Docker Hub and it should be as simple as pulling the image down and running that. You are correct!
A Dockerhub search on the keyword registry brings up the following image as the top result:
Run a container from registry Dockerhub image
$ docker run -d -p 5000:5000 --name registry registry:2
Run docker ps -l to check the recent container from this Docker image
$ docker ps -l
CONTAINER ID        IMAGE               COMMAND                  CREATED             STATUS              PORTS                    NAMES
6e44a0459373        registry:2          "/entrypoint.sh /e..."   11 seconds ago      Up 10 seconds       0.0.0.0:5000->5000/tcp   registry
2.2.2 Tag the image that you want to push
Next step is to tag your image under the registry namespace and push it there
$ REGISTRY=localhost:5000

$ docker tag upendradevisetty/astroml:1.0 $REGISTRY/$(whoami)/astroml:1.0
2.2.2 Publish the image into the local registry
Finally push the image to the local registry
$ docker push $REGISTRY/$(whoami)/astroml:1.0
The push refers to repository [localhost:5000/upendra_35/astroml]
dbc133154d04: Pushed
2efc0f8eb69d: Pushed
2ec163aac8ff: Pushed
0f3a12fef684: Pushed
1.0: digest: sha256:eba0beb8f735a8d32b74bed0e0194c0b04e6d15608c21736f819ca8ee06f83c5 size: 1167
2.2.3 Pull and run the image from the local repository
You can also pull the image from the local repository similar to how you pull it from Dockerhub and run a container from it
$ docker run --rm -p 8888:8888 -v ${PWD}:/root $REGISTRY/$(whoami)/astroml:1.0
[I 17:06:53.813 NotebookApp] Writing notebook server cookie secret to /root/.local/share/jupyter/runtime/notebook_cookie_secret
[W 17:06:54.094 NotebookApp] WARNING: The notebook server is listening on all IP addresses and not using encryption. This is not recommended.
[I 17:06:54.106 NotebookApp] Serving notebooks from local directory: /root
[I 17:06:54.106 NotebookApp] 0 active kernels
[I 17:06:54.106 NotebookApp] The Jupyter Notebook is running at:
[I 17:06:54.106 NotebookApp] http://[all ip addresses on your system]:8888/?token=b0ff6191b65f65a7bdc185597b4168e4f9755d06363dde62
[I 17:06:54.107 NotebookApp] Use Control-C to stop this server and shut down all kernels (twice to skip confirmation).
[C 17:06:54.110 NotebookApp]

    Copy/paste this URL into your browser when you connect for the first time,
    to login with a token:
        http://localhost:8888/?token=b0ff6191b65f65a7bdc185597b4168e4f9755d06363dde62
3. Automated Docker image building from github
An automated build is a Docker image build that is triggered by a code change in a GitHub or Bitbucket repository. By linking a remote code repository to a Dockerhub automated build repository, you can build a new Docker image every time a code change is pushed to your code repository.
A build context is a Dockerfile and any files at a specific location. For an automated build, the build context is a repository containing a Dockerfile.
Automated Builds have several advantages:
- Images built in this way are built exactly as specified.
- The Dockerfile is available to anyone with access to your Docker Hub repository.
- Your repository is kept up-to-date with code changes automatically.
- Automated Builds are supported for both public and private repositories on both GitHub and Bitbucket.
3.1 Prerequisites
To use automated builds, you first must have an account on Docker Hub and on the hosted repository provider (GitHub or Bitbucket). While Dockerhub supports linking both GitHub and Bitbucket repositories, here we will use a GitHub repository. If you don’t already have one, make sure you have a GitHub account. A basic account is free
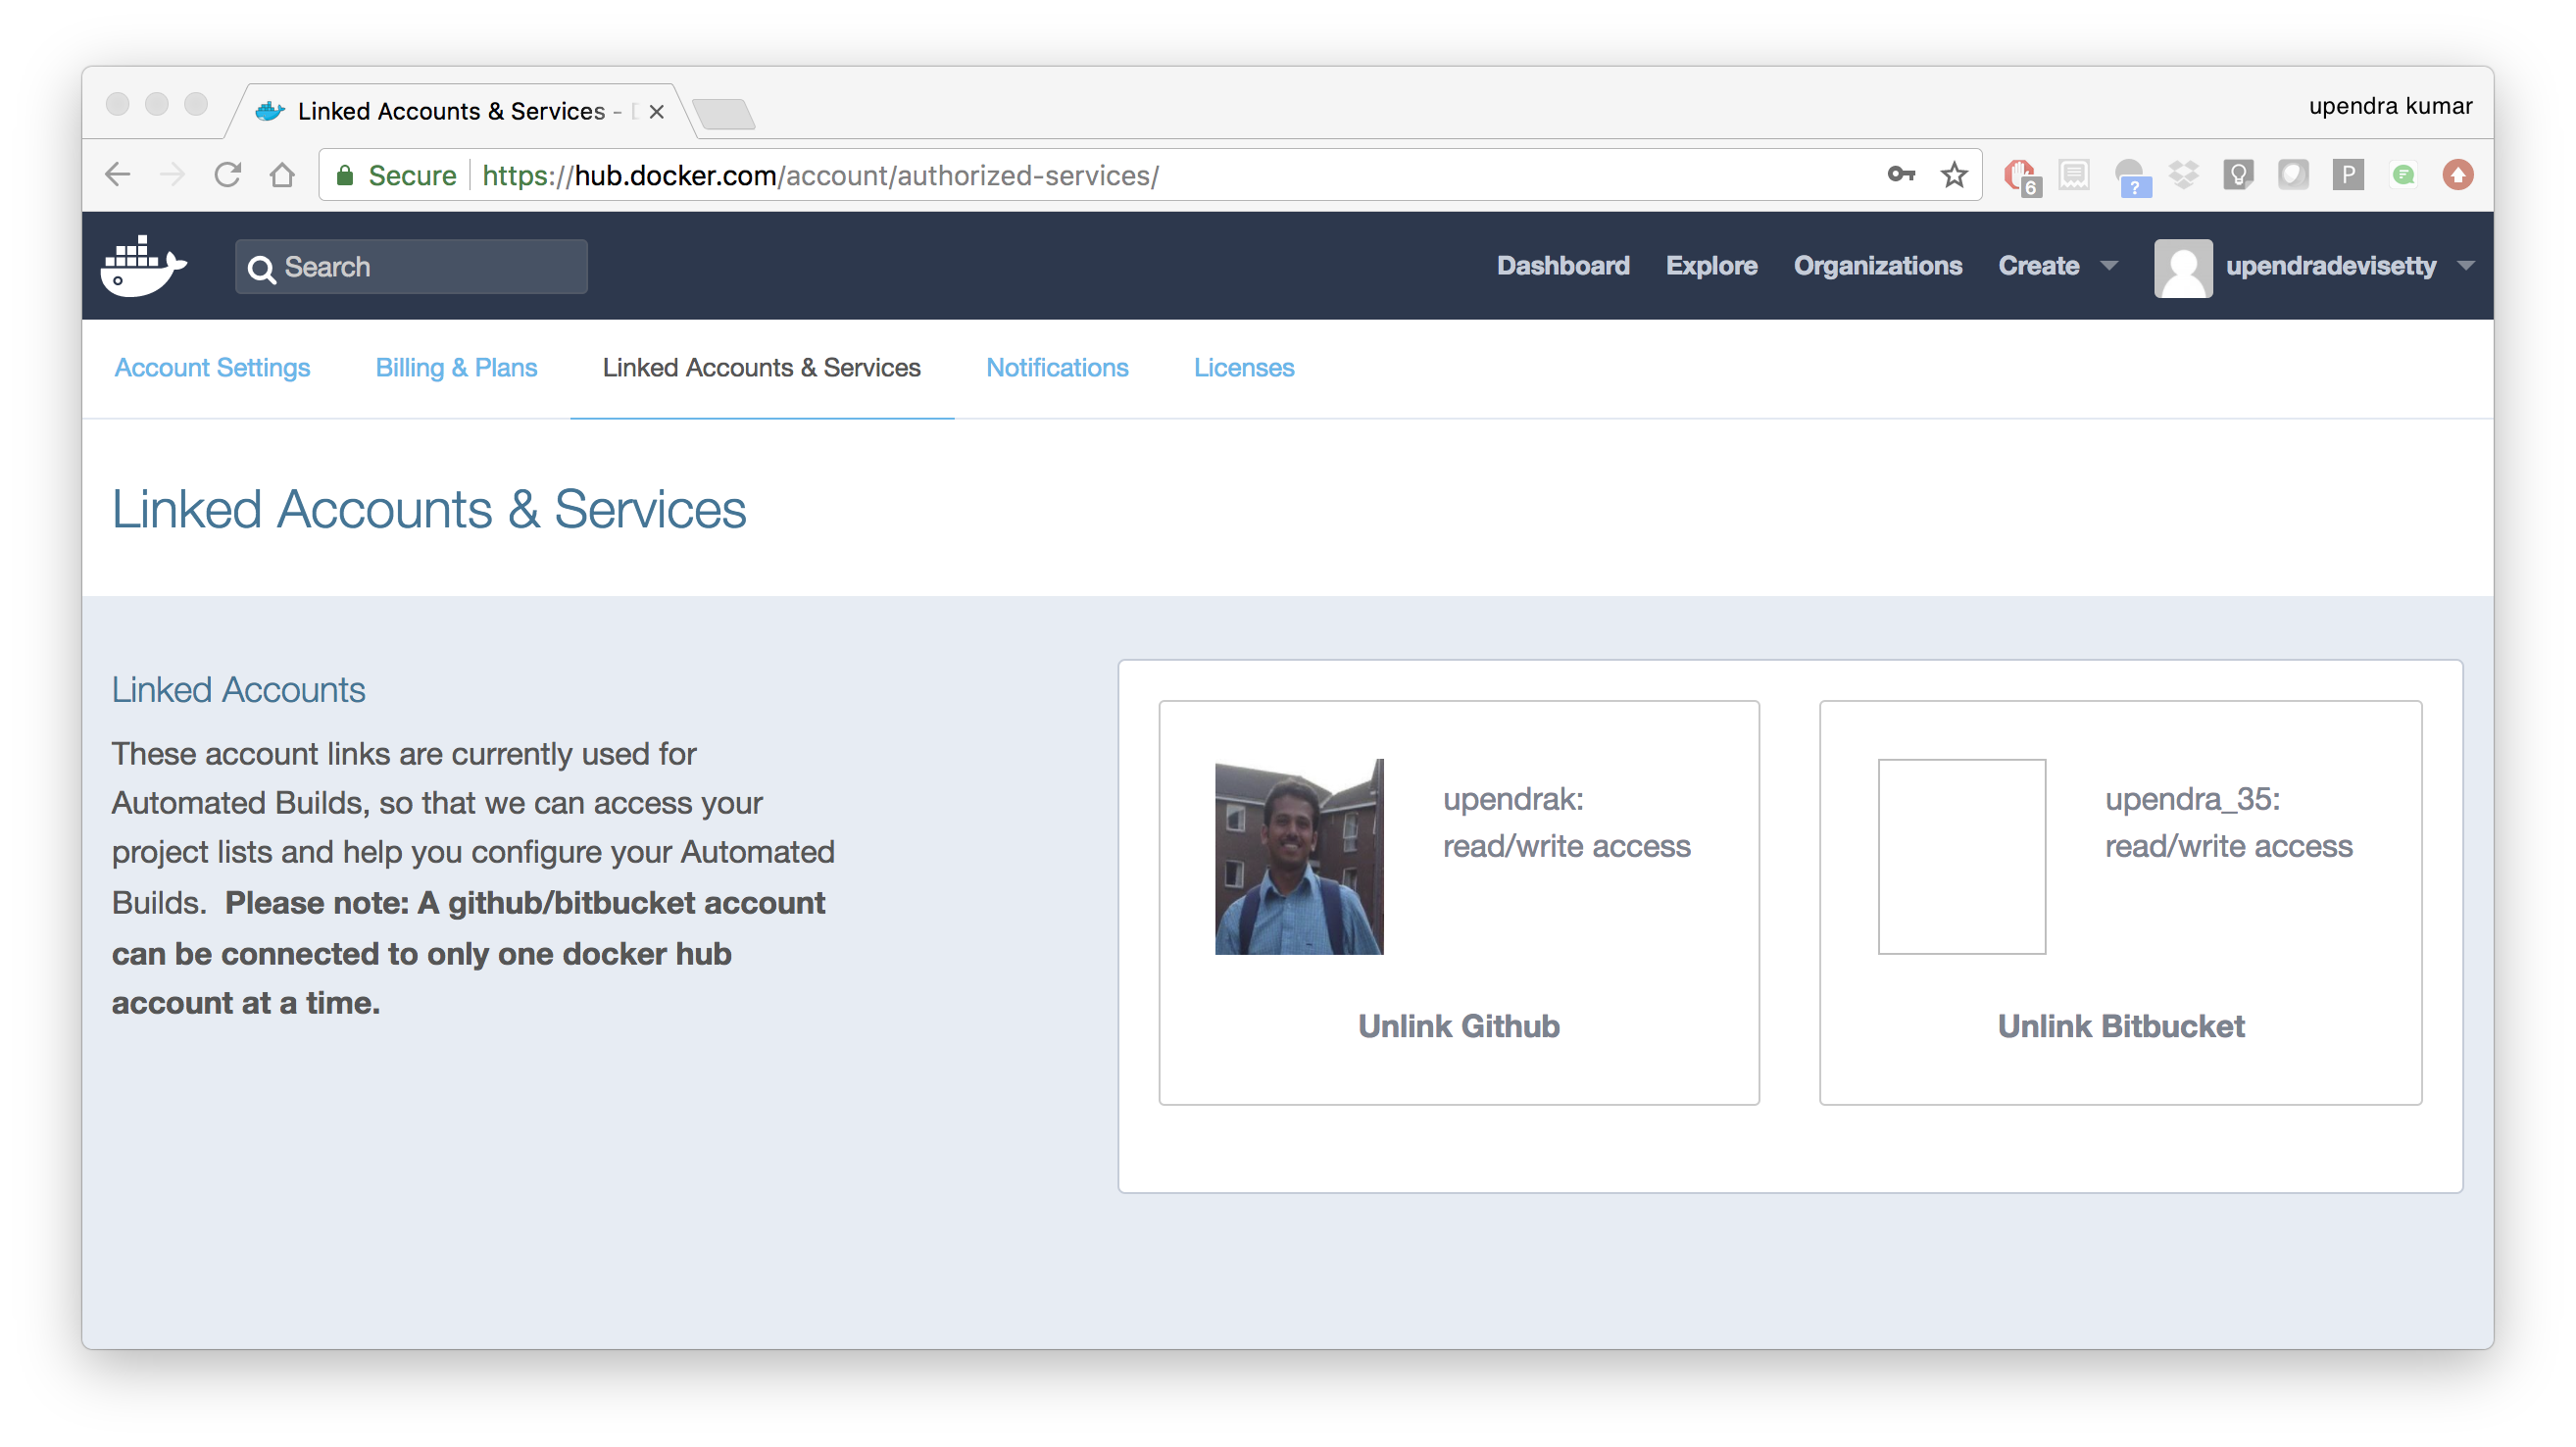
Note
- If you have previously linked your Github or Bitbucket account, you must have chosen the Public and Private connection type. To view your current connection settings, log in to Docker Hub and choose Profile > Settings > Linked Accounts & Services.
- Building Windows containers is not supported.
3.2 Link your Docker Hub account to GitHub
- Log into Docker Hub.
- Navigate to Profile > Settings > Linked Accounts & Services.
- Click the
Link GitHub. The system prompts you to choose between Public and Private and Limited Access. The Public and Private connection type is required if you want to use the Automated Builds. - Press
Selectunder Public and Private connection type. If you are not logged into GitHub, the system prompts you to enter GitHub credentials before prompting you to grant access. After you grant access to your code repository, the system returns you to Docker Hub and the link is complete.
After you grant access to your code repository, the system returns you to Docker Hub and the link is complete. For example, github linked hosted repository looks like this:
3.3 Create a new automated build
Automated build repositories rely on the integration with your github code repository to build.
Let’s create an automatic build for our astroML using the instructions below:
- Initialize git repository for the flask-app directory
$ git init
Initialized empty Git repository in /Users/upendra_35/Downloads/docker_workshop/astroML/.git/

$ git add Dockerfile run.sh plot_spectrum_sum_of_norms.py && git commit -m"Add files and folders"
[master (root-commit) 3d85ec9] Add files and folders
 3 files changed, 83 insertions(+)
 create mode 100644 Dockerfile
 create mode 100644 plot_spectrum_sum_of_norms.py
 create mode 100644 run.sh
- Create a new repository on github by navigating to this url - https://github.com/new
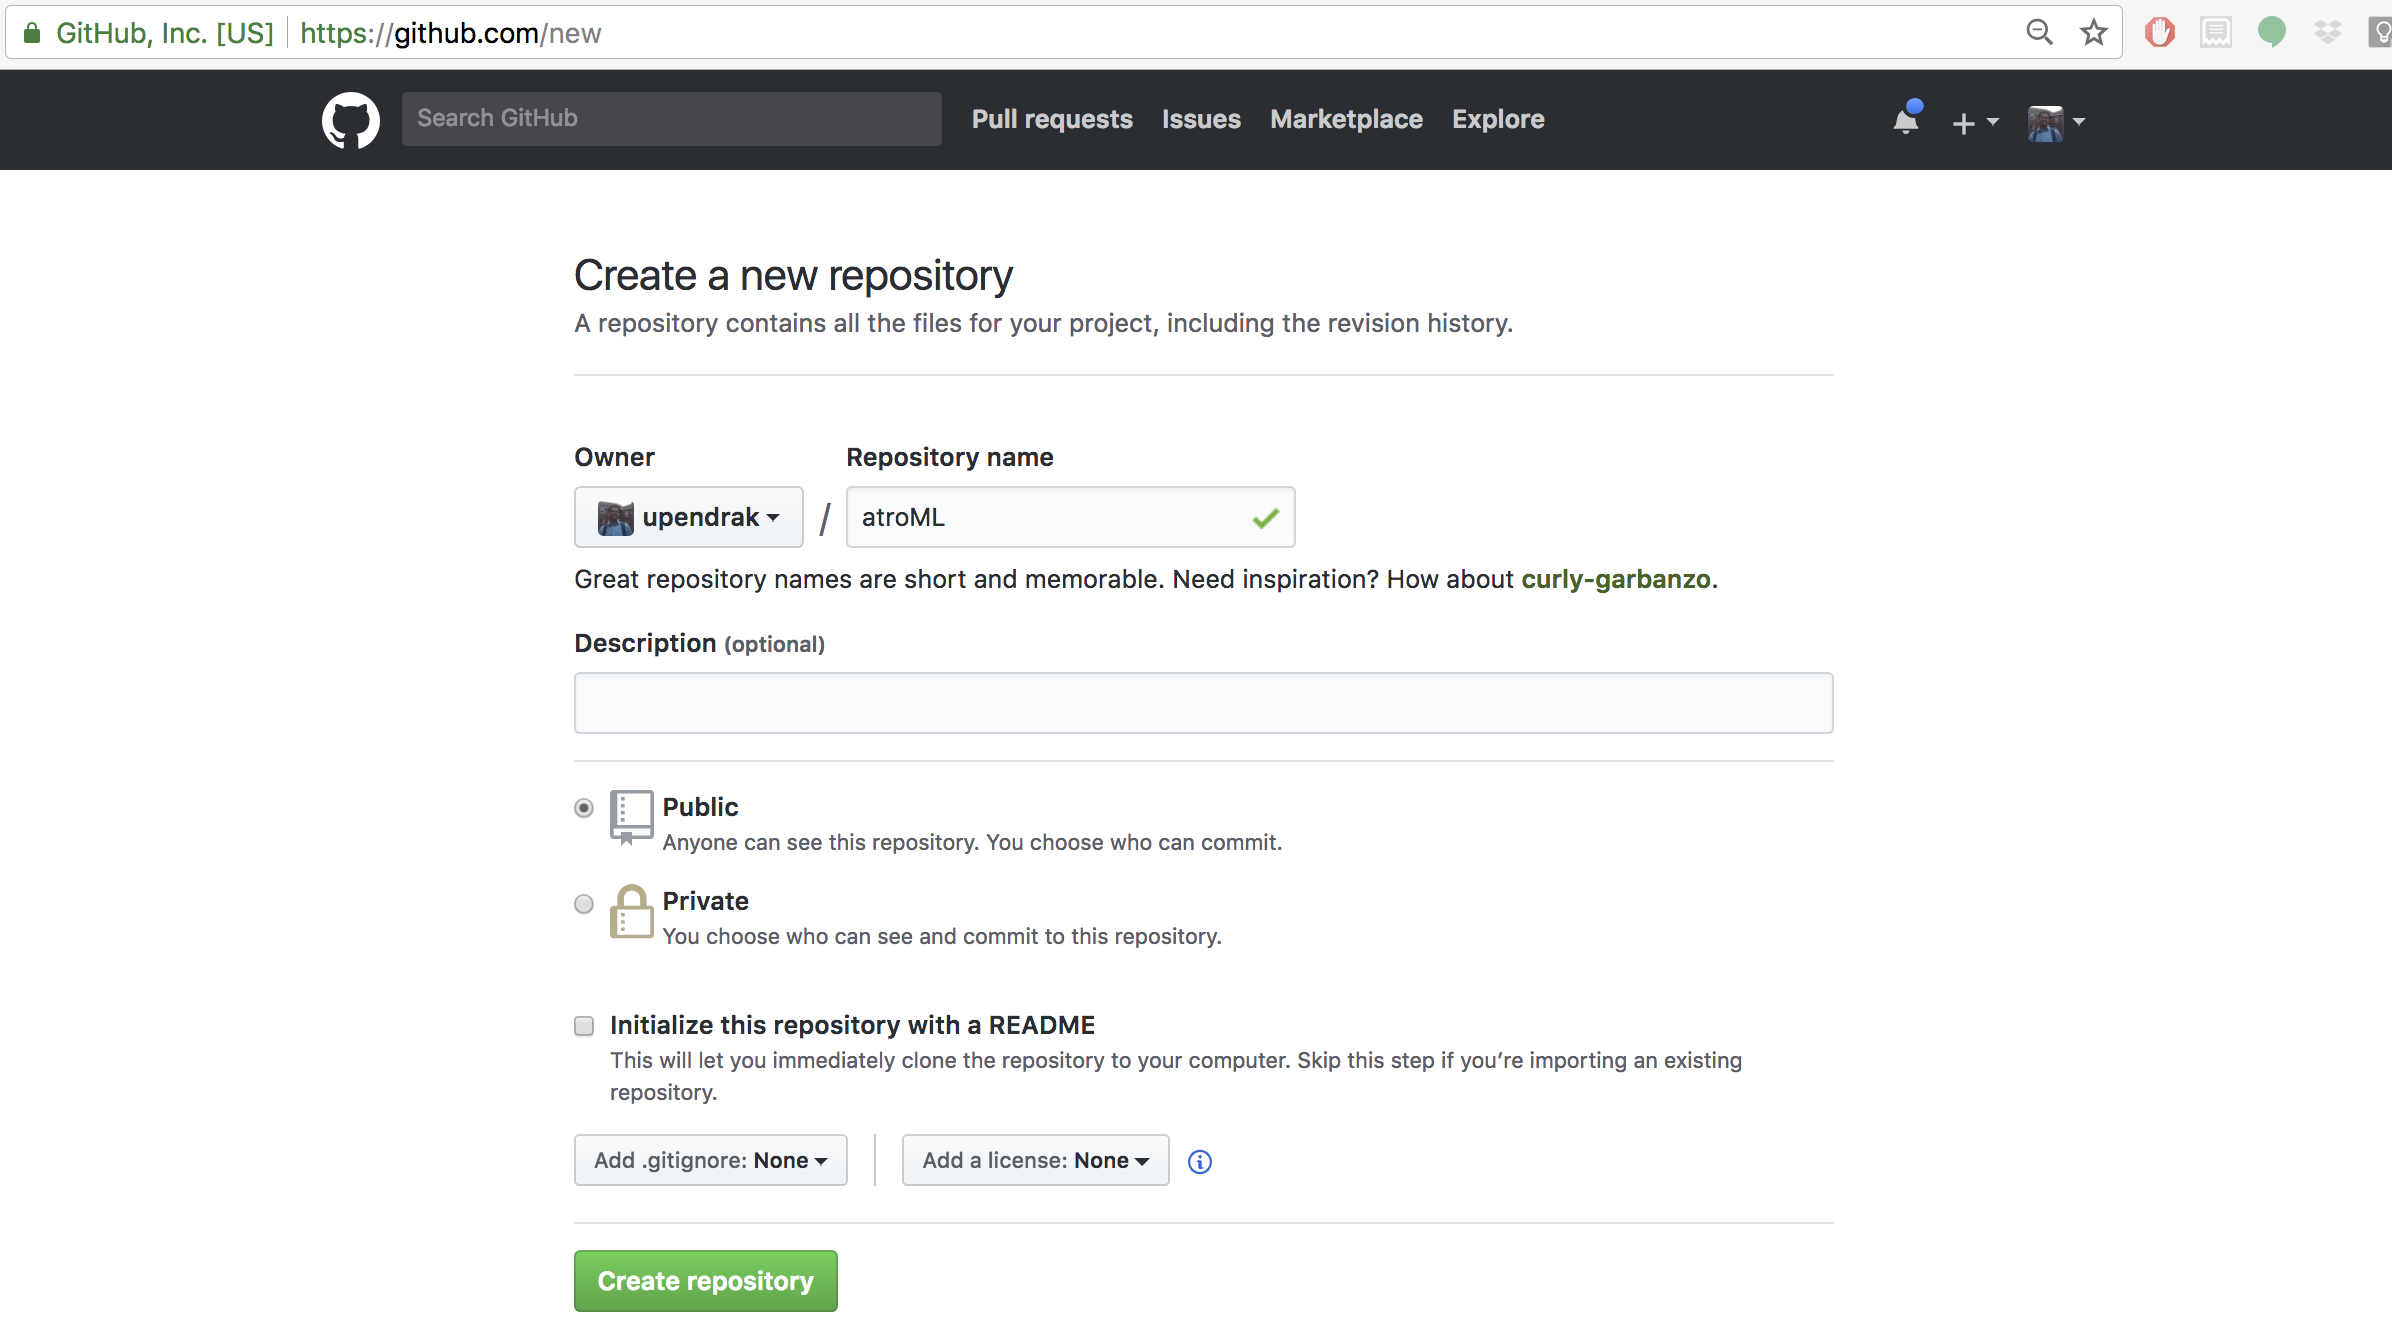
- Push the repository to github

$ git remote add origin https://github.com/upendrak/atroML.git
$ git push -u origin master
- Select
Create>Create Automated Buildfrom Docker Hub.
- The system prompts you with a list of User/Organizations and code repositories.
- For now select your GitHub account from the User/Organizations list on the left. The list of repositories change.
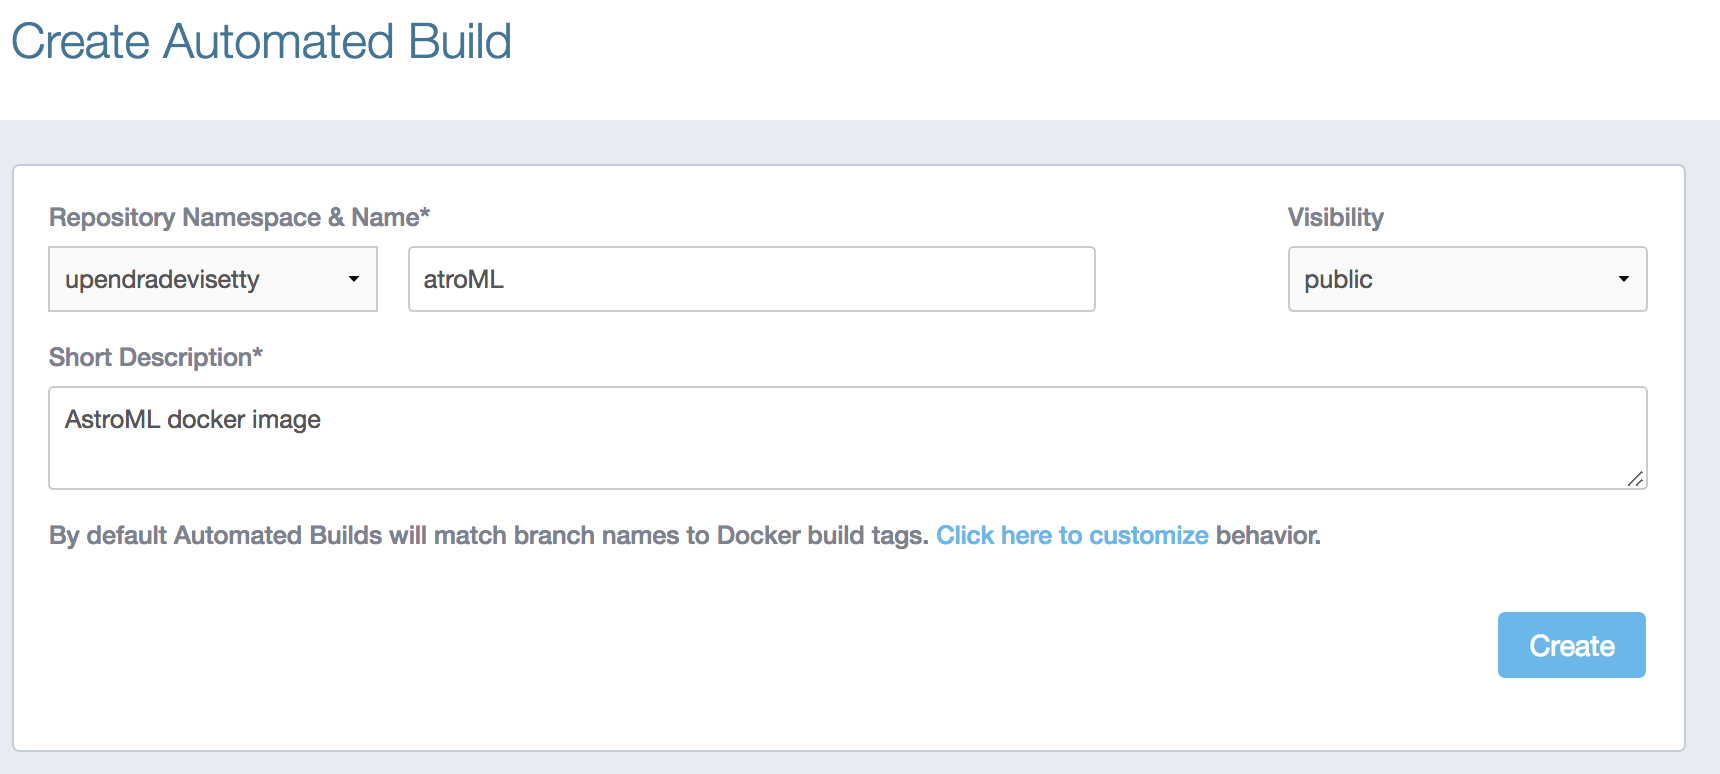
- Pick the project to build. In this case
atroML. Type in “AstroML docker image” in the Short Description box. - If you have a long list of repos, use the filter box above the list to restrict the list. After you select the project, the system displays the Create Automated Build dialog.
Note
The dialog assumes some defaults which you can customize. By default, Docker builds images for each branch in your repository. It assumes the Dockerfile lives at the root of your source. When it builds an image, Docker tags it with the branch name.
- Customize the automated build by pressing the
Click here to customizebehavior link.
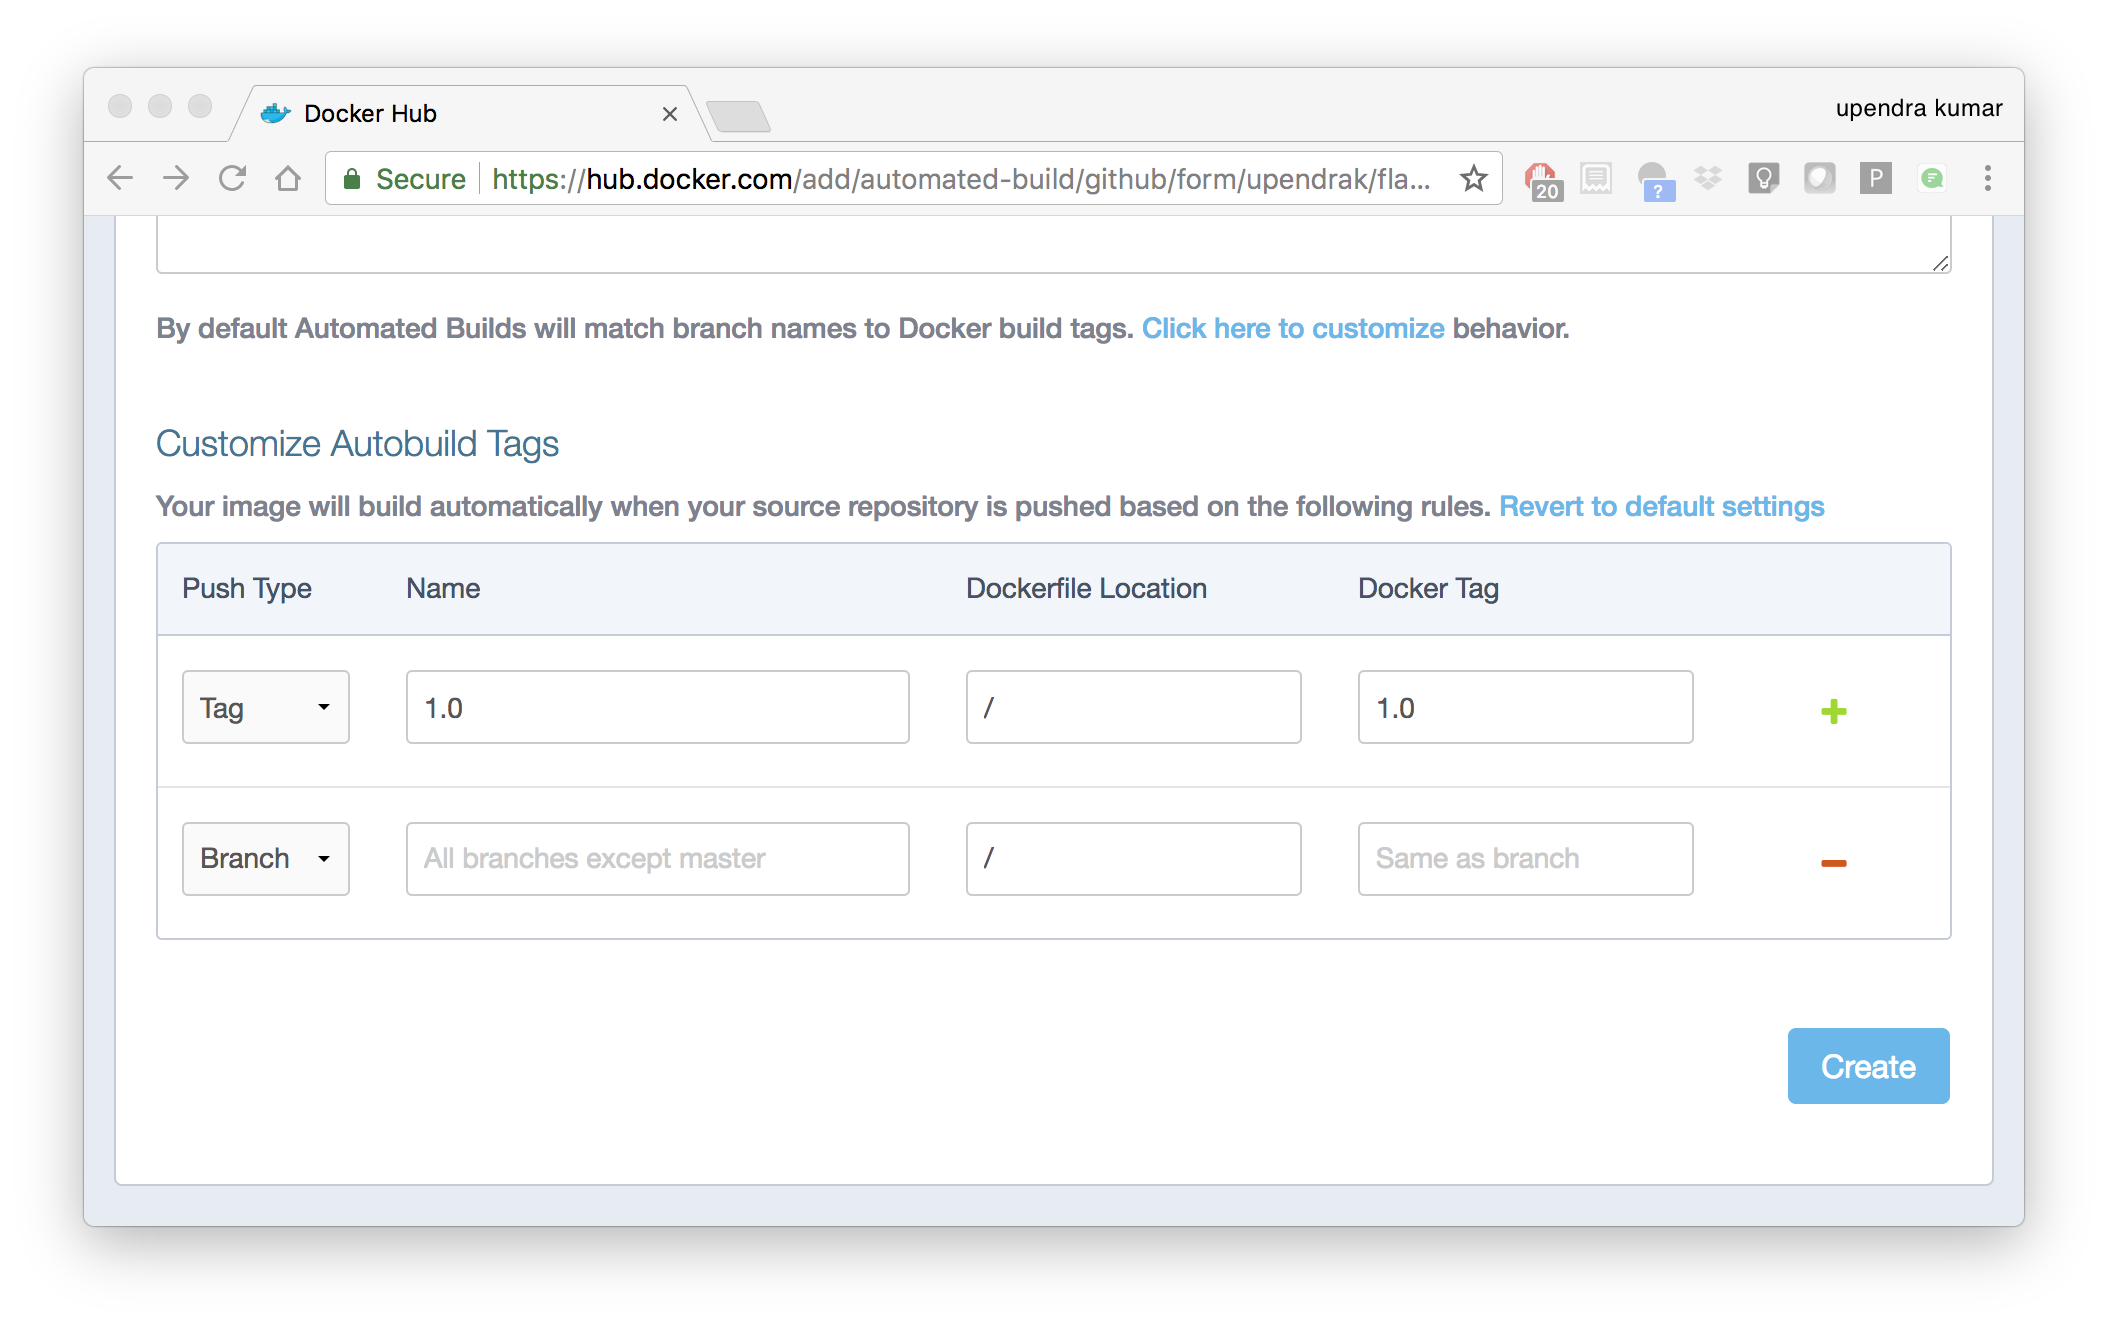
Specify which code branches or tags to build from. You can build by a code branch or by an image tag. You can enter a specific value or use a regex to select multiple values. To see examples of regex, press the Show More link on the right of the page.
- Leave Push Type as Branch as is.
- Leave the Dockerfile location as is.
- Recall the file is in the root of your code repository.
- Specify
1.0for the Tag Name.
- Click
Create.
Important
During the build process, Docker copies the contents of your Dockerfile to Docker Hub. The Docker community (for public repositories) or approved team members/orgs (for private repositories) can then view the Dockerfile on your repository page.
The build process looks for a README.md in the same directory as your Dockerfile. If you have a README.md file in your repository, it is used in the repository as the full description. If you change the full description after a build, it’s overwritten the next time the Automated Build runs. To make changes, modify the README.md in your Git repository.
Warning
You can only trigger one build at a time and no more than one every five minutes. If you already have a build pending, or if you recently submitted a build request, Docker ignores new requests.
It can take a few minutes for your automated build job to be created. When the system is finished, it places you in the detail page for your Automated Build repository.
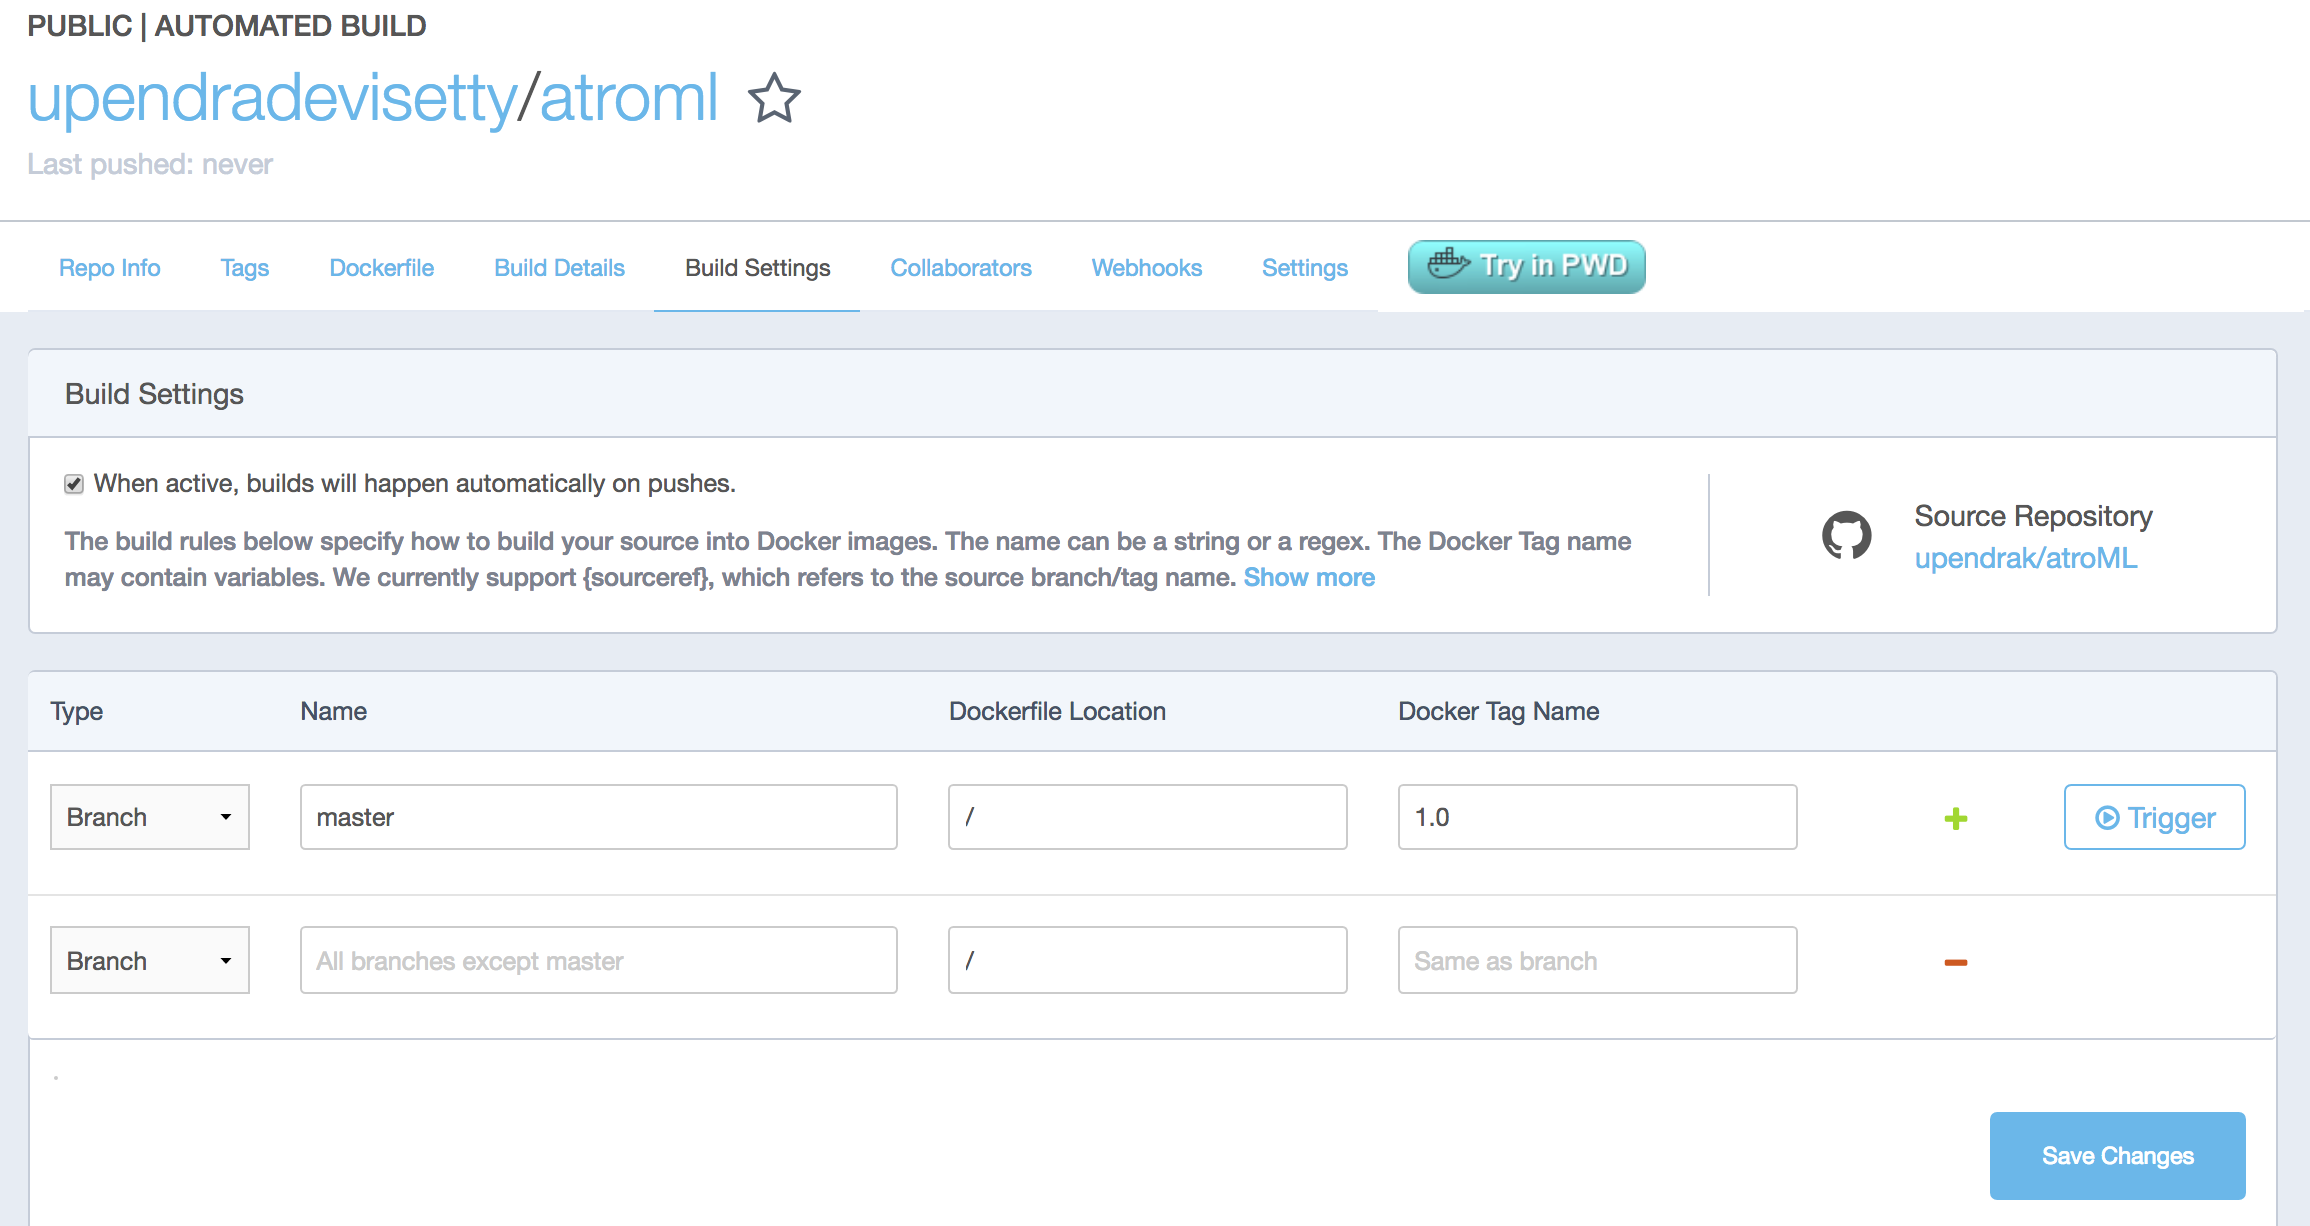
- Manually Trigger a Build
Before you trigger an automated build by pushing to your GitHub astroML repo, you’ll trigger a manual build. Triggering a manual build ensures everything is working correctly.
From your automated build page choose Build Settings
Press Trigger button and finally click Save Changes.
Note
Docker builds everything listed whenever a push is made to the code repository. If you specify a particular branch or tag, you can manually build that image by pressing the Trigger. If you use a regular expression syntax (regex) to define your build branch or tag, Docker does not give you the option to manually build.
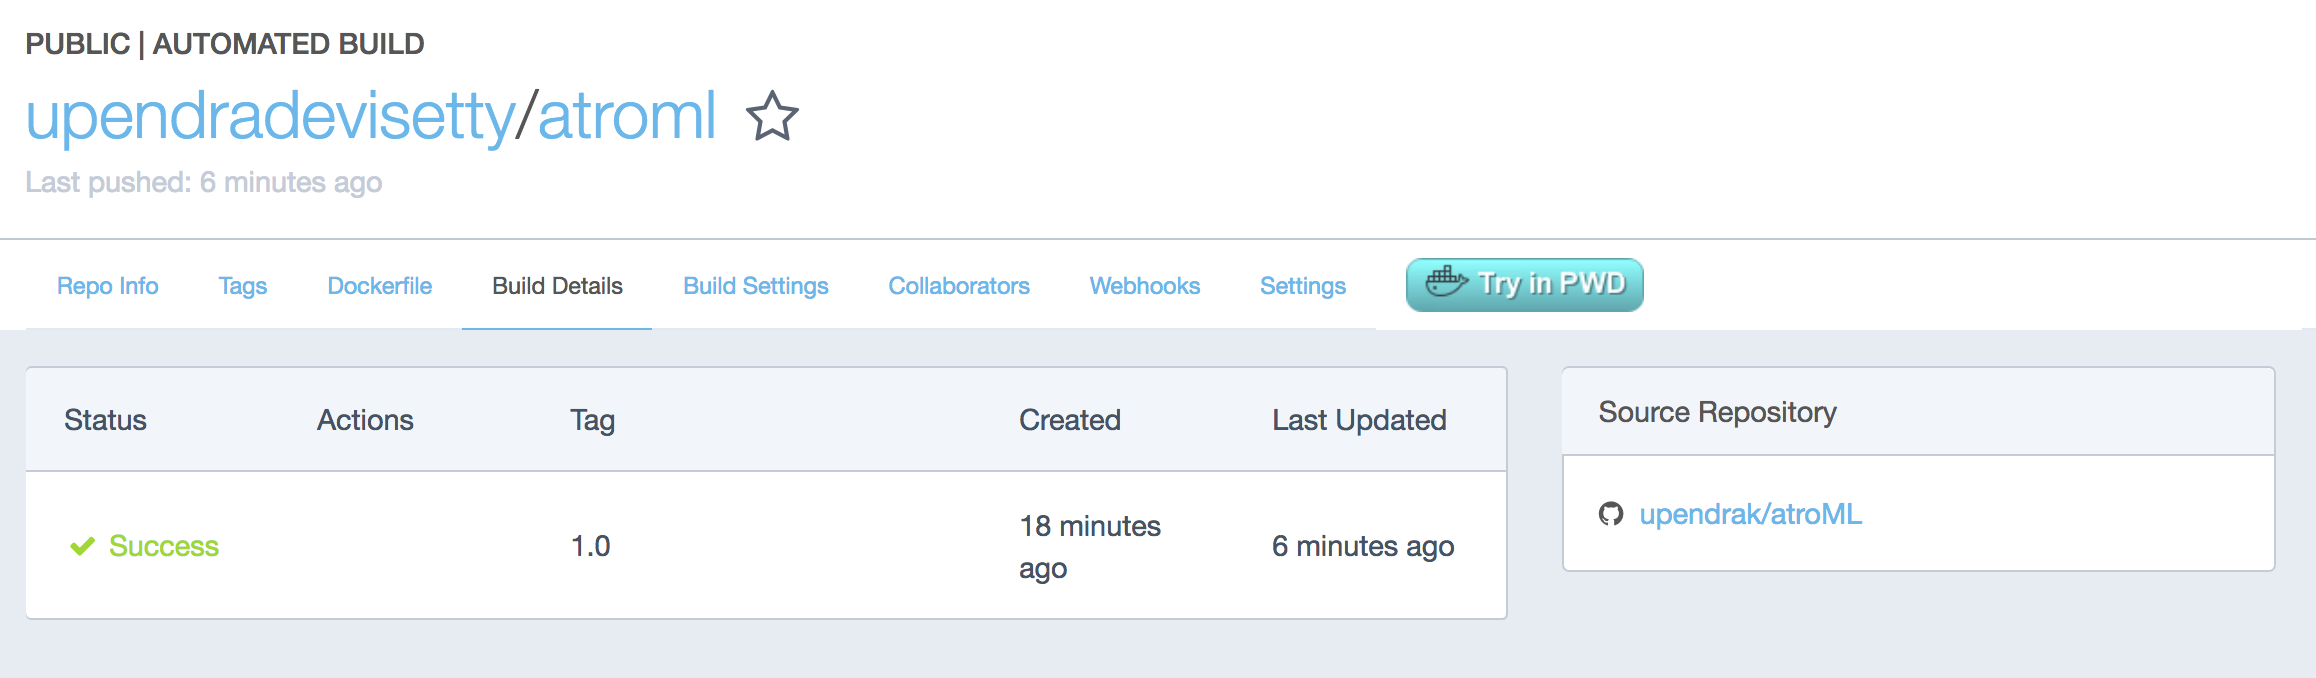
- Review the build results
The Build Details page shows a log of your build systems:
Navigate to the Build Details page.
Wait until your image build is done.
You may have to manually refresh the page and your build may take several minutes to complete.
4. Docker Compose for multi container apps
Docker Compose is a tool for defining and running your multi-container Docker applications.
Main advantages of Docker compose include:
- Your applications can be defined in a YAML file where all the options that you used in
docker runare now defined (Reproducibility). - It allows you to manage your application as a single entity rather than dealing with individual containers (Simplicity).
Let’s now create a simple web app with Docker Compose using Flask (which you already seen before) and Redis. We will end up with a Flask container and a Redis container all on one host.
Note
The code for the above compose example is available here
- You’ll need a directory for your project on your host machine:
$ mkdir compose_flask && cd compose_flask
- Add the following to requirements.txt inside compose_flask directory:
flask
redis
- Copy and paste the following code into a new file called app.py inside compose_flask directory:
from flask import Flask
from redis import Redis

app = Flask(__name__)
redis = Redis(host='redis', port=6379)

@app.route('/')
def hello():
    redis.incr('hits')
    return 'This Compose/Flask demo has been viewed %s time(s).' % redis.get('hits')

if __name__ == "__main__":
    app.run(host="0.0.0.0", debug=True)
- Create a Dockerfile with the following code inside
compose_flaskdirectory:
FROM python:2.7
ADD . /code
WORKDIR /code
RUN pip install -r requirements.txt
CMD python app.py
- Add the following code to a new file,
docker-compose.yml, in your project directory:
version: '2'
services:
    web:
        restart: always
        build: .
        ports:
            - "8888:5000"
        volumes:
            - .:/code
        depends_on:
            - redis
    redis:
        restart: always
        image: redis
A brief explanation of docker-compose.yml is as below:
restart: alwaysmeans that it will restart whenever it fails.- We define two services, web and redis.
- The web service builds from the Dockerfile in the current directory.
- Forwards the container’s exposed port (5000) to port 8888 on the host.
- Mounts the project directory on the host to /code inside the container (allowing you to modify the code without having to rebuild the image).
depends_onlinks the web service to the Redis service.- The redis service uses the latest Redis image from Docker Hub.
Note
Docker for Mac and Docker Toolbox already include Compose along with other Docker apps, so Mac users do not need to install Compose separately. Docker for Windows and Docker Toolbox already include Compose along with other Docker apps, so most Windows users do not need to install Compose separately.
For Linux users
sudo curl -L https://github.com/docker/compose/releases/download/1.19.0/docker-compose-`uname -s`-`uname -m` -o /usr/local/bin/docker-compose

sudo chmod +x /usr/local/bin/docker-compose
- Build and Run with
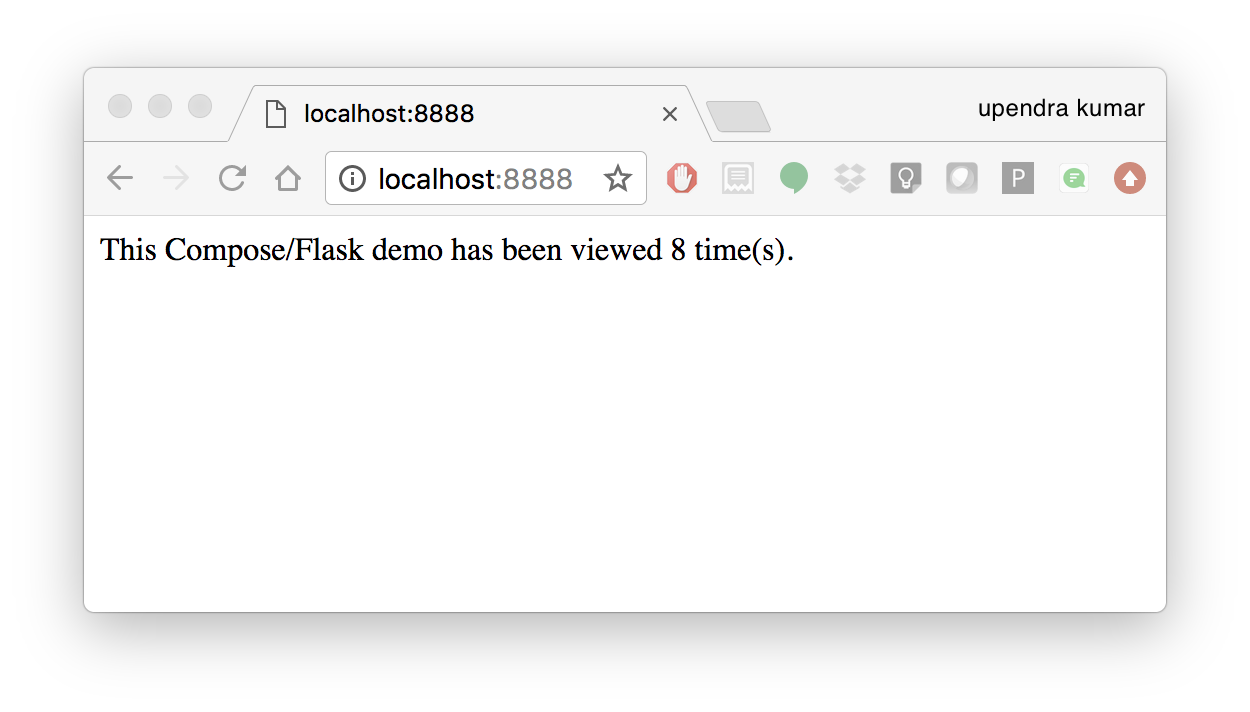
docker-compose up -dcommand
$ docker-compose up -d

Building web
Step 1/5 : FROM python:2.7
2.7: Pulling from library/python
f49cf87b52c1: Already exists
7b491c575b06: Already exists
b313b08bab3b: Already exists
51d6678c3f0e: Already exists
09f35bd58db2: Already exists
f7e0c30e74c6: Pull complete
c308c099d654: Pull complete
339478b61728: Pull complete
Digest: sha256:8cb593cb9cd1834429f0b4953a25617a8457e2c79b3e111c0f70bffd21acc467
Status: Downloaded newer image for python:2.7
 ---> 9e92c8430ba0
Step 2/5 : ADD . /code
 ---> 746bcecfc3c9
Step 3/5 : WORKDIR /code
 ---> c4cf3d6cb147
Removing intermediate container 84d850371a36
Step 4/5 : RUN pip install -r requirements.txt
 ---> Running in d74c2e1cfbf7
Collecting flask (from -r requirements.txt (line 1))
  Downloading Flask-0.12.2-py2.py3-none-any.whl (83kB)
Collecting redis (from -r requirements.txt (line 2))
  Downloading redis-2.10.6-py2.py3-none-any.whl (64kB)
Collecting itsdangerous>=0.21 (from flask->-r requirements.txt (line 1))
  Downloading itsdangerous-0.24.tar.gz (46kB)
Collecting Jinja2>=2.4 (from flask->-r requirements.txt (line 1))
  Downloading Jinja2-2.10-py2.py3-none-any.whl (126kB)
Collecting Werkzeug>=0.7 (from flask->-r requirements.txt (line 1))
  Downloading Werkzeug-0.14.1-py2.py3-none-any.whl (322kB)
Collecting click>=2.0 (from flask->-r requirements.txt (line 1))
  Downloading click-6.7-py2.py3-none-any.whl (71kB)
Collecting MarkupSafe>=0.23 (from Jinja2>=2.4->flask->-r requirements.txt (line 1))
  Downloading MarkupSafe-1.0.tar.gz
Building wheels for collected packages: itsdangerous, MarkupSafe
  Running setup.py bdist_wheel for itsdangerous: started
  Running setup.py bdist_wheel for itsdangerous: finished with status 'done'
  Stored in directory: /root/.cache/pip/wheels/fc/a8/66/24d655233c757e178d45dea2de22a04c6d92766abfb741129a
  Running setup.py bdist_wheel for MarkupSafe: started
  Running setup.py bdist_wheel for MarkupSafe: finished with status 'done'
  Stored in directory: /root/.cache/pip/wheels/88/a7/30/e39a54a87bcbe25308fa3ca64e8ddc75d9b3e5afa21ee32d57
Successfully built itsdangerous MarkupSafe
Installing collected packages: itsdangerous, MarkupSafe, Jinja2, Werkzeug, click, flask, redis
Successfully installed Jinja2-2.10 MarkupSafe-1.0 Werkzeug-0.14.1 click-6.7 flask-0.12.2 itsdangerous-0.24 redis-2.10.6
 ---> 5cc574ff32ed
Removing intermediate container d74c2e1cfbf7
Step 5/5 : CMD python app.py
 ---> Running in 3ddb7040e8be
 ---> e911b8e8979f
Removing intermediate container 3ddb7040e8be
Successfully built e911b8e8979f
Successfully tagged composeflask_web:latest
And that’s it! You should be able to see the Flask application running on http://localhost:8888 or <ipaddress>:8888